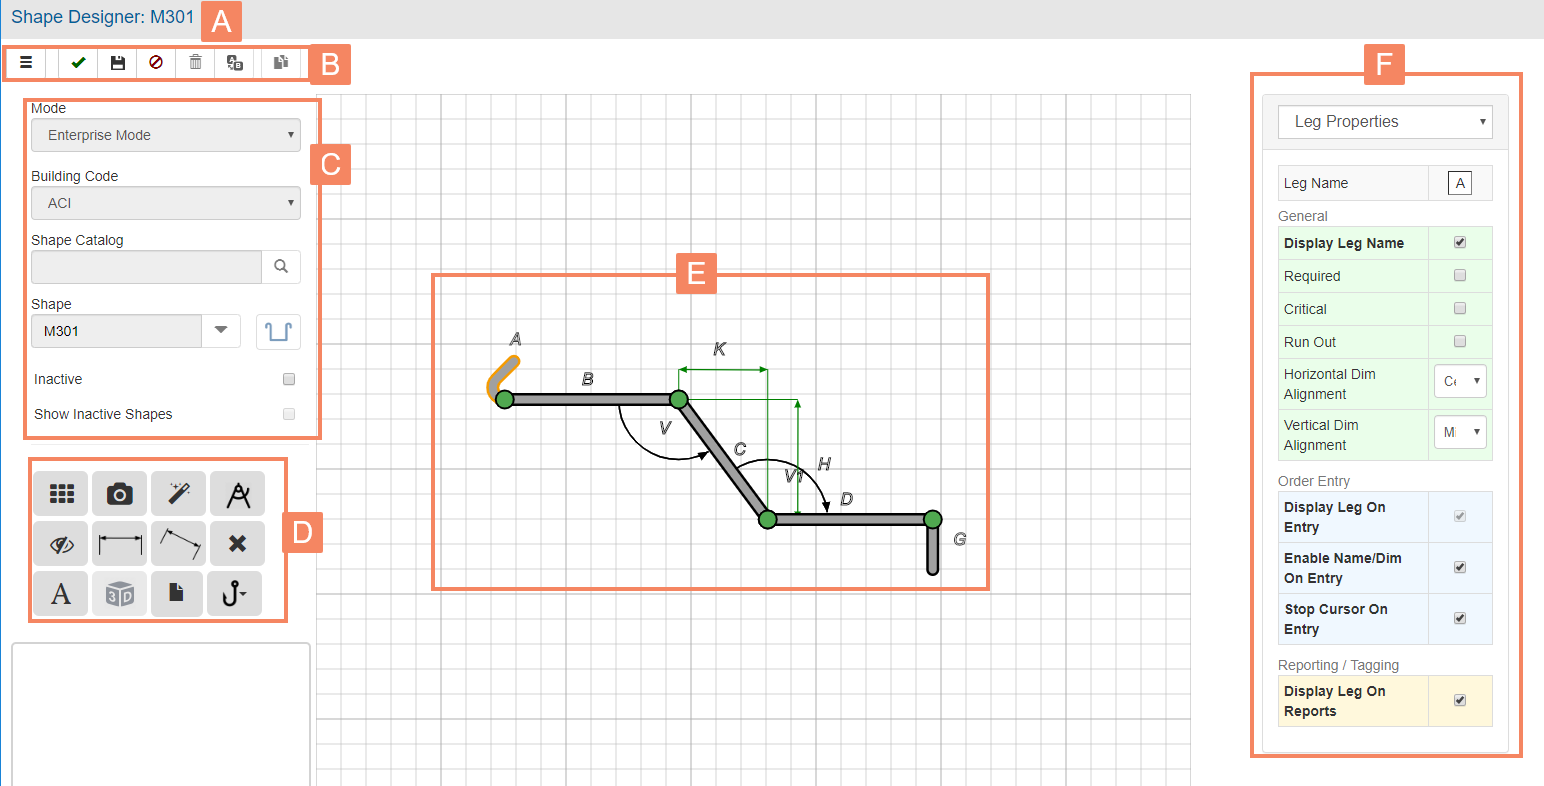
Shape Designer Screen

|
A |
Header Name of the application and the active shape. |
|
B |
Toolbar Buttons Perform basic tasks such as saving and deleting shapes. |
|
C |
Setup Fields Assign a name and select the building code for your shape. |
|
D |
Drawing Tools Perform a variety of tasks related to the current shape, such as deleting legs, adding hooks, hiding the grid, and more. |
|
E |
Drawing Canvas Main area of the screen where you draw your shape. |
|
F |
Properties
|
Toolbar Buttons
![]() Left Menu
Left Menu
Click to open the Tools Left Menu. Click again to hide the menu.
![]() Finish
Finish
Save and close the current shape.
![]() Save
Save
Save the current shape; the shape remains open on the screen.
![]() Cancel
Cancel
Clear the current shape. You will be prompted to save any changes.
![]() Delete
Delete
Remove the current shape from your database.
![]() Rename
Rename
Assign a new shape ID to the current shape.
![]() Copy
Copy
Duplicate a shape.
Setup Fields
Mode
Indicates whether the shape is:
- Standard Mode - Can be used at any level of the system; these shapes cannot be changed or marked inactive. Built-in shapes, such as ACI and BSI are classified as Standard.
- Enterprise Mode - Custom shape that can be used within the current enterprise; these shapes can be changed or redefined (if they are not currently in use within the system). Any shape defined by a non-System Administrator is classified as Enterprise.
Building Code
Select the building code to which the shape belongs.
Shape Catalog
To add the shape to a specific job catalog, select the desired shape catalog. Leave Shape Catalog blank if the shape may be used for any job.
Shape
Identifier for the shape. Up to 5 characters, letters and numbers only. Click Shape Lookup ![]() to view and select from a list of existing shapes.
to view and select from a list of existing shapes.
Inactive
Check to mark the shape as inactive. This prevents the shape from being used for new projects, but does not affect pre-existing data.
Show Inactive Shapes
By default, shapes that are marked inactive are hidden from the shape navigator list and palette selection tool. Check to include inactive shapes in the shape navigator list and palette selection tool.
Drawing Tools
 Hide/Display Grid
Hide or display grid lines.
 Snapshot
Create and download a .PNG picture of the shape.
 Wizard
Center the shape on the canvas and automatically assign dimension letters.
![]() Radius Tool
Radius Tool
Add a radial leg to the shape.
 Display/Hide Dimensions
Switch the view between relative dimensions and dimension letters.
 Straight Witness
Add a horizontal or vertical witness line.
 Diagonal Witness
Add a diagonal witness line.
 Delete
Delete hooks, legs, or witness lines.
 Free Text
Add a block of text to the shape.
 3D
3D
Multi-plane bending shape functionality will be implemented in a future update to Shape Manager. It is disabled as of this documentation's publication date.
 Add Hook
Add a hook to the shape. Click Add Hook, then select the desired hook type:
![]() 90 degree
90 degree
 135 degree
 180 degree
 Report Preview
Click to see how the shape will appear on reports and bundle tags. The shape appears in the display box below the tool palette. Click Refresh ![]() to redraw the preview based on changes to the shape.
to redraw the preview based on changes to the shape.
Drawing Canvas
Click and drag on the canvas to draw your shape. For details, refer to Creating a Shape.
Properties
Use the Properties dropdown combo field to select:
- Leg Properties - Set up properties for a specific leg. For details, refer to Leg Properties
- Shape Rules - Define validation and calculations for the shape. For details, refer to Shape Rules.
