Creating a Shape
Working with Shape Drawings
Use the instructions that follow as a guide to creating single-plane shapes. If you need to create a multi-plane shape, refer instead to Creating a 3D Shape.
You should understand the following guidelines as you create custom shapes:
- Use the grid intersections as a guideline to help you draw perfectly horizontal and vertical lines. Your cursor will snap to the intersections.
- Dimensions display only as a guideline to the relative length of one leg compared to another. Actual lengths are NOT stored as part of the shape; rather, you enter the specific dimensions when you use the shape in the Order Entry screen.
- Draw shape legs from one end to the other. Start with the main legs, then add hooks last. Witness lines for sloped dimensions are automatically added by the system.
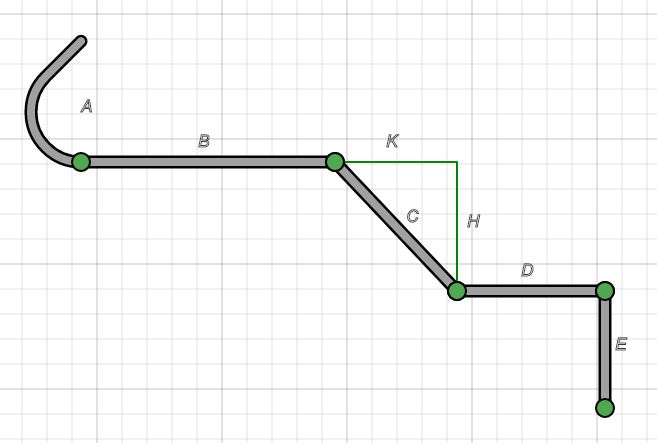
- Although you can change the identifiers if necessary, leg and dimension letters are automatically added based on ACI standards:
- B - F for main legs
- A and G for hooks
- H for slope height and K for slope run
Basic Procedure
The following are the basic steps to create a custom shape. Additional tools and activities are described in the sections that follow.
To create a new custom shape:
- In Shape field, enter an identifier for your shape.
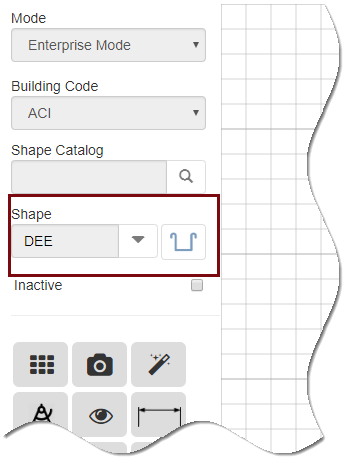
HINT: To edit a shape that already exists, select the shape from the list or enter its name.
- Draw the main shape legs:
- Work from one end of the shape to the other.
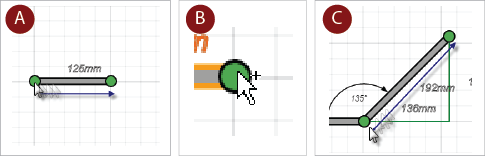
- Click and drag to draw a leg. (A)
- To add to an existing leg, hover over the end point of a leg until you see a +. (B)
- Click on the + and drag to add the new leg. (C)
- Use the grid intersections as a guide to drawing horizontal and vertical legs.
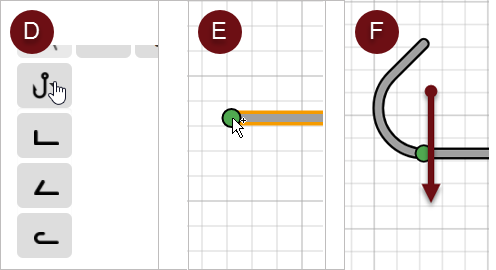
- Add hooks to one or both ends of the shape:
- Click the Hooks tool, then select the desired hook type: 90 degree, 135 degree, or 180 degree. (D)
- Hover over the end point of a leg until you see a +. Click on the + to add the hook. (E)
- If necessary, change the direction of the hook by double clicking on it. (F)
HINT: If you make a mistake and need to delete a leg or hook, click the Delete ![]() button, then click the leg you want to remove.
button, then click the leg you want to remove.
- Click the Shape Wizard
 tool.
tool.
The wizard automatically centers the shape on your canvas and assigns letters to all of your dimensions.
- Click the Display/Hide Dimensions
 view.
view.
The shape displays with the dimension letters.
- Optionally:
- Rename or change default leg properties as described in Leg Properties.
- Set up validation and calculation rules as described in Shape Rules.
- Click Finish
 .
.