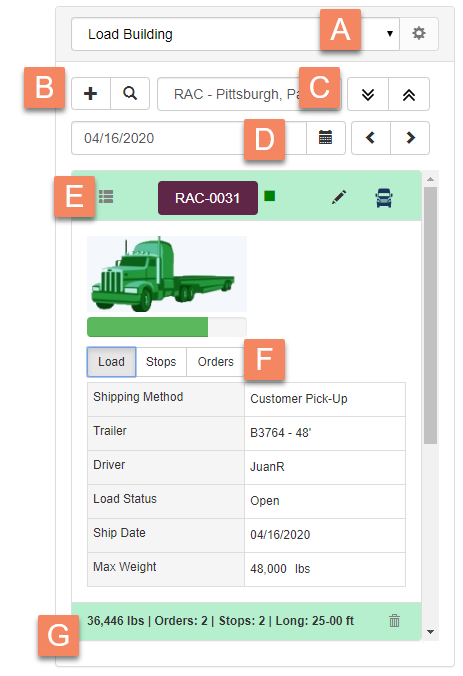
Load Building Screen Overview
Use the following as a guide to working with the Load Building screen.
|
A |
Calendar Selection Pull-down Select either the Scheduling or Load Building calendar. |
|
B |
New Load Provides quick access to the Main Menu, Tools, Reports, Dashboard, Location, Settings, and Notifications for the active module. |
|
C |
Left Menu Display or hide the left menu. |
|
D |
Toolbar Tools for working with the active module. |
|
E |
Right Menu Display or hide the calendar. |
|
F |
Calendar Provides a quick view of when items are scheduled for fabrication and shipping. |
|
G |
Load Overview Provides a quick overview of the load. |
Toolbar Buttons
![]() Exit
Exit
Close the screen. Return to the previous screen. If you made changes, you will be prompted to save.
![]() Save
Save
Save screen data without clearing.
![]() Finish
Finish
Save and clear the screen.
![]() Clear
Clear
Clear the screen. If you made changes, you will be prompted to save.
![]() Delete
Delete
Delete the current load.
Load Information
Load is a required field. Other fields are optional, but, at a minimum, Carrier and Trailer should be completed; without these fields, you will not see a picture or the maximum trailer weight while you are scheduling your loads.
Load
Unique identifier for the load.
Valid Entires:
- New load: click Add
 to have the system automatically assign a load ID or type a unique ID up to 10 characters.
 - Existing load: Click Lookup
 to select the load from list or type the load ID.
Carrier
Company that will handle the transport of the load. Examples: Our Truck, ABC Transportation, or Customer Pickup.
Valid Entries: Carrier defined in your Environment Tables (Scheduling > Carriers).
Trailer
Trailer that will transport the load to its destination. If defined, the trailer picture displays next to the field.
Valid Entries: Trailer defined in Environment Tables (General > Trailers).
Load Symbol
Symbol that displays on Load tag and Load Building Report to ensure that all materials stay together and other materials do not get mixed.
Valid Entries: Any shape, number, or letter available through the Shape and Color Palette Window. Click the block next to Symbol to select a color.
Load Status
The status of your load.
Valid Entries: Open, Loaded, or Shipped. If you use aSa Load Tracking, the load is automatically updated to Shipped when you scan the load tag.
Load Comment
Enter a comment about the load that can appear on the Load Building report.
Shipped
Date the shipment left the fabricating location.
Time Shipped
Time the shipment left the fabricating location.
Delivery Date
Date the load was delivered to the jobsite.
Valid Entries: Calendar date. Click the arrow to select a date from an on-screen calendar.
Delivery Time
Time the load was delivered to the jobsite.
Valid Entries: Time in the following format: HH:MM AM or PM.
Load Sequence
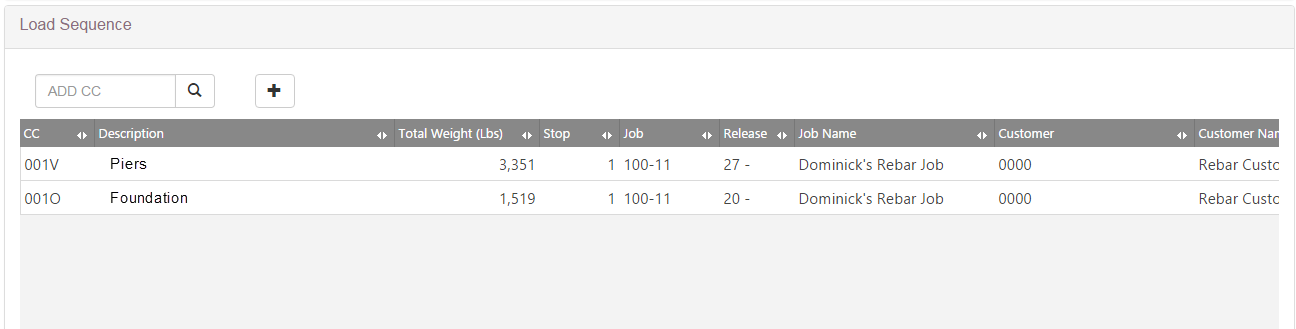
Control Code
Add bar lists to the load.
Valid Entries: Type a control code, then click Add ![]() , or click Lookup
, or click Lookup ![]() and select one or more control codes from a list.
and select one or more control codes from a list.
Load Sequence Grid
Displays a list of the bar lists included on the load. In the grid, you can:
- edit the Stop field to indicate the delivery stop for each bar list.
- drag and drop rows to set the load sequence of the bar lists
Refer to Managing Bar Lists on a Load for more details.
HINT: Click on a column header to sort. Drag and drop column headers to resequence the columns.
Summary Information
Summary information displays at the bottom of the screen:
- Load Name
- Weight of items currently on the load
- Maximum capacity of the assigned trailer