Working with Line Entry Customization Settings
Applying Settings
To use the default customization setting:
- Simply open the Line Entry screen.
- Your default customization setting automatically applies.
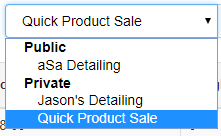
- The setting name displays in the dropdown at the top of the screen.

To use any saved customization setting:
- In the Setting dropdown, click and select the setting that you want to use.

Saving Settings
To save a customization setting:
- Make any desired changes to the setting as described in Customizing Line Entry and Customizing the Right Menu Pane.
- In the Customize Line Entry Screen:
- Click Save
 to update the current setting.
 - Click Save As to create a new setting.
HINT: To make the setting available to other users, check Public.
Alternative:
- On the main Line Entry screen, apply the desired setting, then click Settings
 and select Save or Save As.
To save a customization setting as your default:
- In the Customize Line Entry screen, click Set as Default.
Deleting Settings
To delete a customization setting:
- In the Customize Line Entry screen, open the setting that you want to delete.
- Click Delete
 .
. - At the Confirm prompt, select Proceed.
Note: You cannot change or delete standard default settings provided by aSa; you can customize them and use Save As to create new settings.
